Sunday, January 26, 2014

Hackschooling

Recently I have seen this video making the rounds on facebook.


Logan is a well spoken young man and clearly "Hackschooling", as he calls it, is working for him. At first viewing, this seems like a great way to do it and why can't every kid have an education just like this! Perhaps my years in education have made me a cynic, but I have a much more realistic view of education and I take issue with the premise that homeschooling is for everyone. Certainly, there are some families and students that this works very well for, but it doesn't work for everyone. I have had good friends who have home schooled successfully and I have taught students who returned to public education after homeschooling who were misserved by this education. I have friends who were home schooled who didn't live up to their own potential because of it and others who were able to achieve more. There is no one size fits all answer.

That being said, here are my issues with this talk…


1) This is an extremely privileged view of education.  Not all parents have the resources this family has.  They don't have the monetary resources,  they don't have resources of  background knowledge or education, and they don’t have the luxury of the time it takes to homeschool a child.  Picking and choosing your own curriculum is wonderful, so long as you have a parent who is well versed enough to be diligent with the curriculum and have the time to put into being your only teacher. Frankly, I don’t feel like I know enough to actually teach my child a foreign language, or physics, or english properly (and I am a teacher) but you can always hire out those parts, right?   Being able to join in homeschooling co-op groups is great, if you can afford the private ski lessons, or even just the private spanish tutor.  Having starbucks as your classroom is a luxury many of us can’t afford. For the vast majority of families this model is untenable.  


2) Teaching children to be happy and healthy is the job of their parents, regardless of if they are homeschooling or sending their students to a traditional school.   Should education support the parents in this job? Absolutely!  But it is not possible for a teacher who sees them for 5 hours a week to teach a student how to be spiritual, enjoy nature, volunteer service in the community, etc. especially given the narrow parameters we are allowed to operate within. Nor should parents expect this of teachers.  Which brings me to my final point.


3) Education like this is actually possible in schools. 

The 8 items needed to be happy and healthy (according to the ted talk) are “exercise, diet and nutrition, time in nature, contribution and service, relationships, recreation, relaxation and stress management, religious and spiritual”  


Let me repeat, Education like this actually is possible in schools. It is actually happening in schools.  Waldorf schools do it.  Catholic schools get close (they hit spirituality and service pretty hard, perhaps they need a little work on diet and nutrition). Public schools are putting out fires, but they have their moments,  teachers who fight for classes like forensics, home ec, music, outdoor ed, or even classes with projects that can’t be evaluated in a traditional way but are truly meaningful.  Extra curriculars that give students the opportunity for service and time in nature.  These things all happen in current schools, however they happen in limited ways.  We are focused on solving crises, providing food, social work and counseling.

Putting out fires aside, if you would like me, your public school teacher, to teach your child something besides just math I absolutely have that ability.  I can teach lots of cool things that are applicable to life and the real world and even include math. I can teach math in ways that students will actually understand it and not just memorize it.  I can teach them ways that mathematics can be meditative and relaxing and enjoyable through art, cooking, knitting and sewing, puzzles and games.   But you know what, that means that the public would need to trust the professionalism of teachers.    Public Educators have had our hands tied by legislation from public officials that the public has elected.    If you want this sort of education for your children, then why are public schools being forced to do standardized testing? “common core” curriculum? Why are teachers being blamed (and evaluated)  for under performance in math, science, reading, english, etc when we have very little say so over how and what we teach?   Why are teachers unions under fire when one of the (many) things they lobby for is teacher autonomy?   And if you want your kids to learn physics from a ski instructor then why are you so upset to pay teachers private ski instructor wages?   When teachers spend all their time preparing for standardized tests, evaluations, and fighting to retain our pensions how can we possible have the time or energy to reach the level of creativity an organic education like this would take?   Believe me,  most of us would love to teach that way if only we were given an opportunity.   If this is a model of education that you really wish for your children, then realize what it would take to get there.  

Then go vote to make it happen.
Sunday, May 20, 2012

Potato Salad Recipe


This wasn't an Iron chef dinner, but I made this delicious potato salad today and I wanted to write down what I did before I forgot.  I have a tendency to make something delicious with whatever I have lying around and then I am never able to repeat it.  I didn't measure anything while I was making this, so all the measurements are guesstimates.


Yukon gold potatoes - 5 medium ones
mayo (a bunch? I never measure)
freeze dried dill (2 tsp)
dry tarragon (2 tsp)
celery salt - just a sprinkle
2 tbl spns brown mustard - the kind that has lots of seeds and is a bit spicy
2 tbl spns mcclures spicy pickle relish
1 finely chopped shallot
finely diced celery (3 ribs)
2 hard boiled eggs

I peeled the potatoes and put them in a pot with cold water and a bunch of kosher salt and the two eggs.  Once the water hit a boil, I timed the eggs for another 12 minutes and then fished them out.  The potatoes continued to boil until a paring knife stuck in them easily.  I let the eggs and potatoes cool while I chopped and mixed up the dressing.  I chopped up the potatoes and eggs, tossed it all together with the other ingredients, salt and pepper to taste, and then garnished with some chives fresh from the garden.

I attribute the deliciousness to the spicy relish and mustard.

Thursday, March 31, 2011

Decorate the Cake- Mystery project part 2

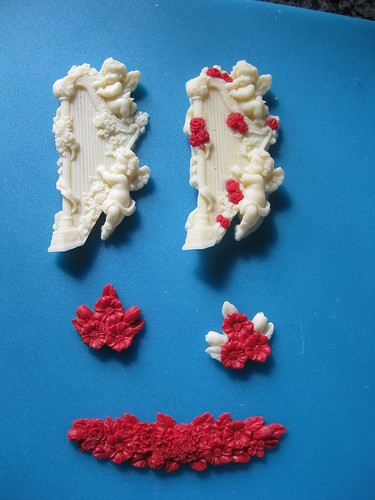
When I saw these molds I thought that the harp looked so like a Michelangelo sculpture, I tried to get that effect by using chocolate and candy melts which are opaque instead of using poured sugar.  The result does in fact look like a statue and would make a great stand alone candy piece, or be lovely atop a wedding cake or valentine. 

To make these candy molds, you can use either candy melts, or almond bark or melting chocolate.  I feel like it is more economical to use almond bark when color is not necessary.   You will also need a decorator piping bag for each color you plan to use.  Depending on the temperature in your kitchen and how fast you work, you may also like to use a heated work surface.  I use a heating pad under a cookie sheet when my candy is setting too quickly.  I also like to work with multiple molds and colors at the same time. If multi-tasking is not your thing, you can plan your layers of color and work one color at a time.  

Put your candy melts or chopped up almond bark into the decorators bags.  Melt in the microwave at 30 second intervals one bag at a time. Be sure to check for hot spots, mash the bags around to mix, and towards the end I often drop down to 15 second intervals to ensure that I don't burn the candy or melt the plastic. Depending on how fast you work and the temperature in your work space you might need to experiment with out long you melt your candy. 


Once the candy is melted, snip the tip of the bag.  For very fine detailed work, go about 1/8th of an inch.  For larger areas, you can go a bit bigger. 


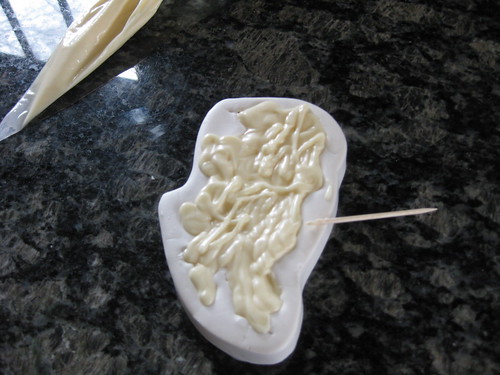
For solid areas of color, you can use the tip of your bag to get down into the details and fill in as you go. The neater you are when you fill now, the less clean up you will have to do at the end.  After you have filled the mold, take a toothpick and use it to stir and smooth the candy and clean up the edges of the mold.  If you have no colored details, you can also use the toothpick to ensure the candy has gotten into all the corners of the mold. 


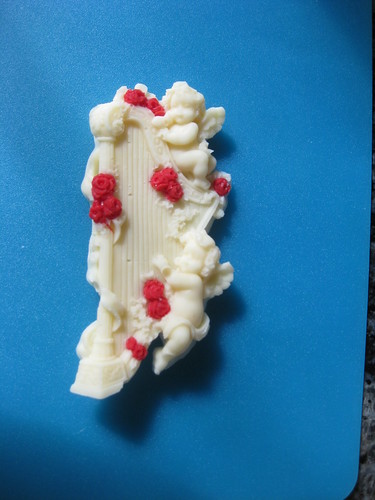
If you would like to add colored details, you must do that before you fill in the main color.  Here, I piped in the roses and let them set prior to adding the white. 


This particular mold has many fine details, so it was important to have very warm melted candy and a fine tip to get into the little corners.   I sometimes have a hard time seeing what the details will be from reversed image you get looking at just the mold, so before I choose to add color I like to create a solid candy in the mold and look for things like flowers or ribbons that I want to have in color.  If you hate the solid one, you can always re-melt the candy and use it again.  Be careful when you re-melt the candy melts or chocolates.  They do not always melt as slowly the second time, and if you try to re-melt them too many times they do get a bit funky. You can some times get uneven color or spotting or a bit of a frosted white look to your end piece as the repeated melting affects the tempering of chocolate. 

Once the detail colors have set, fill in with your back ground color.  This time as you smooth with your toothpick, be aware that if you stir too deeply you can end up mixing in your contrast color.  This is a nice effect if you are going for marble or swirls, but if you want crisp edges you should avoid poking down too deep. 


Now, wait for your candy to set. If you are impatient you can put them in the freezer to speed up the process. When I remove the molds, I loosen all around the edges before I pop out the entire piece.  DTC molds are extremely flexible, even out of the freezer. Here is a close up of the harp with red roses. 


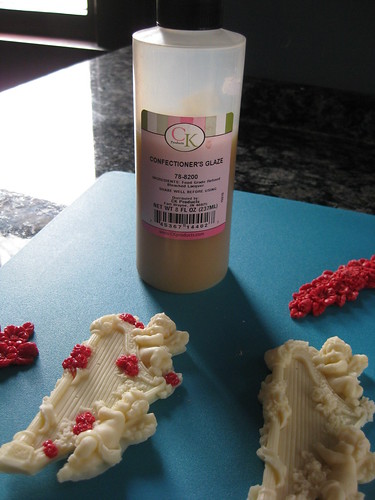
If this is a show piece and you really want to make it pop, brushing on a dab of Confectioners Glaze will make your candy very shiny.  I used it on only the roses to add to the contrast.  


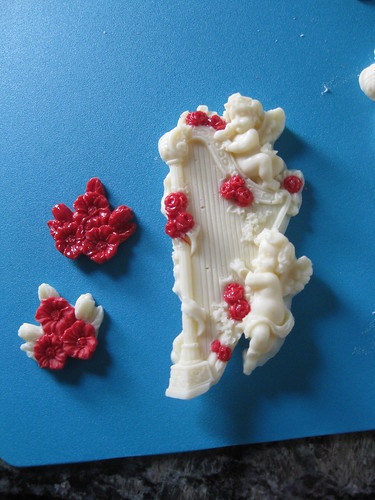
In this image you can see, the solid red flowers are glazed, and the ones with contrasting white buds are not. You can also see how the roses on the harp stand out, making the matte white look more like marble or an ivory statue.  It is a very nice finishing effect. 


Decorate the Cake - Mystery Project!

I was pleasantly surprised to find my Mystery Project was several lovely rose molds, a harp, and cupid.  The largest of the rose molds was the perfect size to do something slightly different than your typical Decorate the Cake how to,  molded butter!  Now, to create a lovely butter to accompany a romantic dinner the choice of mold is very important.  Butter is softer and more fragile than candy.  It is brittle when its cold, and very soft at room temperature.  Unlike gum paste or fondant, butter never hardens. It can be a tricky substance to mold, and your selection of a shape or mold to use will make or break your finished product.  To illustrated this very important point, I have included a "what not to do" example along with my how to.

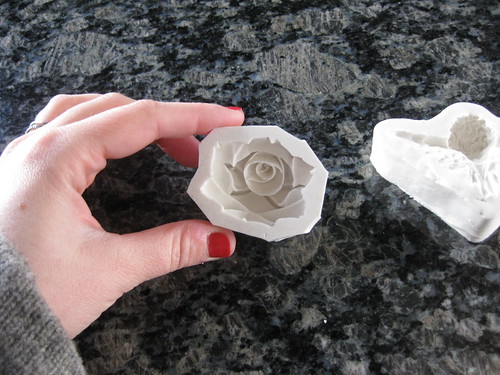
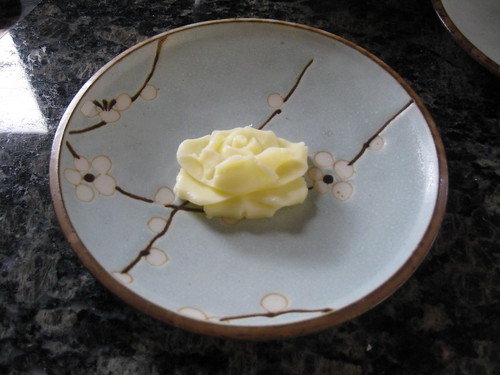
My choice mold for the butter.  Notice, the rose is deep and round, compact and with out too many outlying shapes.

And equally adorable, but ill-suited for a butter application, we have cupid. See how cupids wings are very shallow? Watch what happens to poor Cupid. 


To create the butter mold, the easiest way to get the most details from your mold is to melt your butter. The liquid butter runs into every nook and cranny. You can also use softened butter and spackle it in with a butter knife, but I find that there are many air pockets and you lose details in your finished product. The trick to using melted butter is to be careful to not over-melt the butter. Butter has a high water content, and if over heated the water can evaporate out of the butter and mess up the consistency. I put two pats of butter in the microwave for 30 seconds until it looks like this. 


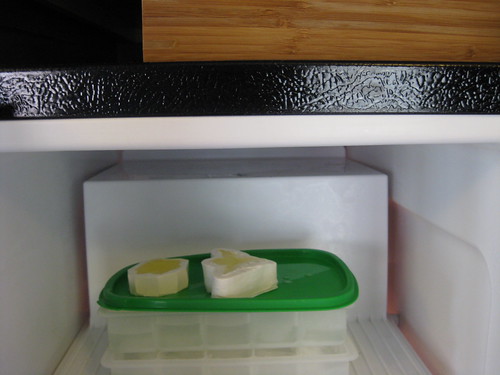
A few seconds of stirring ensures that it is melted completely and not over melted.  Then pour into your molds and put in the freezer to set for 5 or 10 minutes.  The amount of time it takes to set will depend on how large your mold is and how hot your butter was.  The good news is that you can't over-freeze butter. Frozen butter  comes right back to room temperature beautifully, so when in doubt leave it in 5 minutes more before you fuss with it.  Also, be aware that liquid butter is happy to spill all over your freezer, so take out some insurance by placing the molds on a tray with a lip.  It is easier to keep things level, and to clean up spills. 


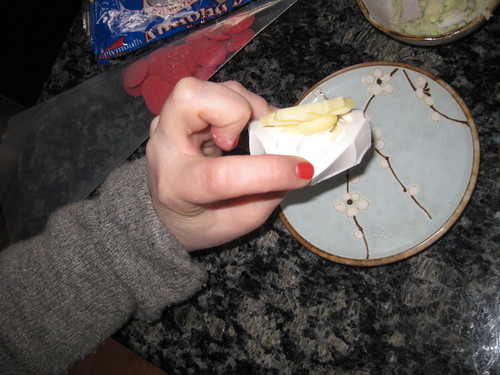
Now comes the fun part!  Time to un-mold!  DTC molds are extremely flexible.  I like to pull back all around the edges before I pop out the molded item.  If your butter is set hard enough, and your mold was compact and round, it will come out just like a chocolate or hard candy. 


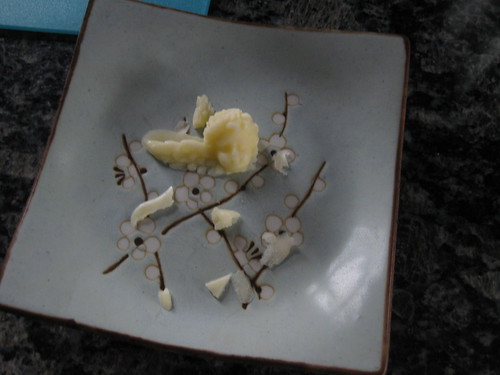
If your mold had thin feather wings like our friend Cupid, or very shallow parts here is what happens. Notice, the wing I over poured came out, but with that ugly extra lip. Cupid's head was deep and round, it looks good.  But that thin little wing was just too brittle and it fell apart, along with the v shaped feathers under his face. There are just some shapes and designs that are not meant to be in butter.  


But look at our lovely rose! 


Now, if plain old butter is too boring for you, get creative!  There are hundreds of delicious herb butter recipes out there. Here are a couple tips for making molded herb butter. 

#1 The tinier the pieces of herbs, the less they will poke out or interrupt the design of your mold. Remember, we are doing this for the beauty of the finished piece and not just the flavor. 
#2 Just because every recipe on the planet says to use fresh herbs doesn't mean you cant use dry, or even better, freeze dried. Dry herbs tend to be in smaller pieces and mix into liquid butter easier than fresh. 
#3 Experiment with your favorite flavor combinations!  You don't need a recipe. Choose something to go along with whatever recipe you are making for the meal.. Herb Butter is a delicious addition on top of mashed potatoes, steak, fish or chicken as well as breads and rolls. 
#4  If you are using unsalted butter and making a savoury herb butter, be sure to add some salt! 

A few flavor profiles that I really love:  
Garlic Powder and Thyme
Honey and Cinnamon
Cardamom and Curry Powder
Chive and Onion Powder
Ginger (I like to use fresh grated)
Lemon and Dill. 

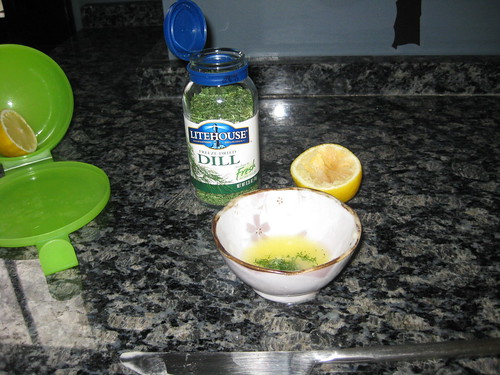
Here is how I made the Lemon Dill Butter.  I used freeze dried dill, but dry or fresh would work as well.  Be sure to start with either melted or softened butter to make it easier to mix.  Just a splash of lemon is enough, so start with a little and then adjust for taste.  Remember, butter has a large water content, so it can take liquid ingredients if you mix well and use the right proportions.  Mix well, mold, and put in the freezer to set! 


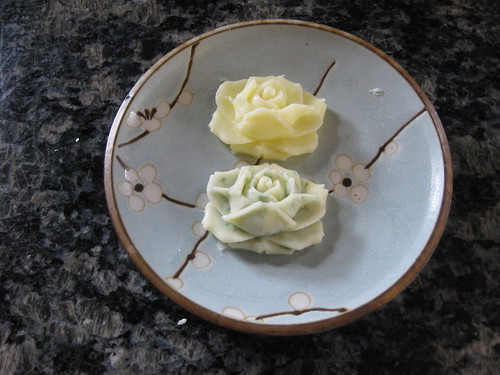
And here are my final roses, ready to sit atop a fresh bun! 


Stay tuned for part 2, a more traditional molded candy. 

Wednesday, March 23, 2011

Iron Chef Dinner: Battle Beer

Me -vs- my inability to do anything in moderation

I am limiting myself to iron chef dinners one day a week now.  This is to limit the grocery bills, and so that I actually accomplish other things with my time besides cooking. Not that we mind eating it all. :)

This desire to be more moderate includes trying to use what ingredients we have instead of purchasing tons of new items every week.  So for battle beer I tried to use only what was in the house.  Our land lord left us with two bottles of Winter Bourbon Ale in the fridge when we moved in and I recently bought some Honey Brown for nostalgia's sake (and then continued to drink nothing but wine as usual). I couldn't really make an iron chef beer dinner with out including Guinness though, so I caved on that one and ran out and picked some up. Choosing my dishes was not easy as beer lends itself to many delicious things, so instead of making less dishes I just made smaller servings.  Still, too much food. So much that we actually skipped the entree. So much for moderation.

Appetizer #1 was baked brie filled with a mushroom mixture that had been sauteed in the Winter Ale.  Dan tasted it and said "It smells like Thanksgiving." and even though it was nothing like Thanksgiving, there was something about the mushroom and herbs and puff pastry that really did smell like it.

Appetizer #2 was Fish and Chips, battered in a Honey Brown beer batter.
The fish was tillapia in a seasoned batter, and the "chips" were various veggies like carrots, parsnips, beets, peppers, and onions. I tried really hard to make this a small dish, but that beer batter just puffs up.


Our Entree was Guinness Shepard's pie.  We are going to eat it for dinner tomorrow. It smelled good.


And finally, the piece de resistance:  Guinness Chocolate cake frosted with Bailey's buttercream.

Which I have decided to call Irish Car Bomb Cake.  Dan decided to make himself an Irish Car Bomb with the leftovers.

Thursday, February 10, 2011

Iron Chef Dinner: Battles Venison Steaks and Pecans

Me -vs- Unpacking the Kitchen

Well we made it to Michigan, and I unpacked the kitchen.  You all know what that means!
After 2 weeks of eating pantry and freezer items and take out and restaurant food, it was time for Iron Chef!

The last freezer item from the old place was two venison steaks from a deer that was lovingly shot by our friend Mash. The first item in our new freezer was a package of frozen corn left by the girl who lived here before us.  The dish was inspired by Allison.  I cut the steaks into medallions and coated them with flour. Then I seared them in a pan to medium rare. I set the steaks aside and sauteed onions and mushrooms and added some chicken stock and cream to make a sauce.  I served the steaks and mushroom sauce over mashed potatoes with corn on the side and a squeeze of lemon.   Instant mashed potatoes, but shhh. dont tell.  
I managed to snap a photo with my phone before Dan devoured everything.


For battle pecan, I may have gone overboard, but it was good. :)

I made a pecan caramel corn that was just the right balance of savory and sweet.  I normally hate caramel corn because its just sugary and gets stuck in your teeth, but the salt on this was just right. I also got Dan some whole pecans in the shell to snack on before dinner. There is something nice about freshly cracking, peeling, butchering, or picking your own food. I think working for it makes it taste better.

Dinner was Pecan crusted chicken Kiev, with broccoli pecan casserole and a green salad with a cranberry pecan vinaigrette.  Chicken Kiev, while delicious, is one of those things that should only be made rarely.  The amount of work it takes is RIDICULOUS.  One of the recipes I saw called for making like 8 servings, and it makes sense now.  They freeze really well uncooked, and you only mess up the kitchen once.   The broccoli casserole was tasty and easy, it had a cheesy creamy sauce with horseradish in it.   The pecan vinaigrette was really great, and Ill be making that again. I blended some dried cranberries and pecans together to make a pasty mealy consistency, just before it would have turned into nut butter.  Then I added red wine vinegar and olive oil and some honey and herbs.

Dessert was individual Chocolate Pecan Pies (recipe stolen from Paula Dean) and we never even got to them last night because we were so full.

No photos of this dinner either, I can't seem to find the camera in all this mess. :o\

I'm off to empty another box!

Thursday, September 02, 2010

Iron Chef Dinner: Battle Wine

Me -vs- the week from hell.

Let's see, this week involved new neighbors who leave their junk on the stairs and block my parking space making me late for work, a coworker having a heart attack at school, a ticket for going straight at the intersection of Randolph and Oak Park Avenue (which  I totally know better) amongst other lesser annoyances and drama.  I would like to think that my ever wise and loving husband knew that I needed a battle that would be relatively quick and easy and boozy to boot!

This is one of the first battles that I actually made in under an hour.  I opted for steaks smothered in baby portabellos and a Pino Noir reduction, with a side of almond green beans.   Yes, I used yellow tail and barefoot wines.  I figure, its a step up from cooking wine and not breaking the bank.


Then, for desert I made two kinds of wine poached fruit. Pears were poached in pino noir, and peaches in a pino grigio and then served with a reduction of their poaching liquid and some sweet marscapone cheese.  


It's always amazing to me how wine and cheese can just make everything in life a bit better. 

Monday, August 23, 2010

Iron Chef Dinner Party!

Battle Goat Cheese and Kale

Shawna and Jerry were invited over for dinner, and as the guests of honor, they got to choose the secret ingredients.  Jerry was of course difficult and his chosen ingredient of kale required a special trip to a special grocery story. Billy's Fruit Market was happy to provide me with the kale I needed, and so the battle was on!


We were so happy to socialize and eat and drink, that no photos were taken.  That is just fine.   For appetizers I made my traditional goat cheese in tomato sauce, tapas style served with french bread.   Then the meal was a goat cheese and mushroom meatloaf roulade, goat cheese mashed potatoes,  a kale, squash and goat cheese casserole with a panko bread crumb crust, and then a simple but delicious sauteed kale and garlic.  The meatloaf was my favorite part, and I will be making that again.  Surprisingly, the experimental casserole was enjoyed even by Dan, who doesn't like squash. That just goes to prove, if you put enough butter and garlic in anything it will taste good.

Thursday, August 19, 2010

Iron Chef Dinner: Battle Curry

Me -VS- the spice cabinet

We are back from vacation, and tired of fried food.  There is a joke about Canada, they say that Canada could have had French cuisine, American politics, and British culture and instead they ended up with British cuisine, French politics, and American culture.  So true, so true.   The fish and chips were excellent but I can only eat so many meals accompanied by french fries before my stomach begs for mercy.

In preparation for tonights dinner, we got to go to Penzey Spices which is always a treat. I picked up a hot curry spice and a bottle of garam masala seasonings.  I also picked up a recipe for a coconut pie so I could use up all the coconut left over from battle mango.

First I slowly caramelized some finely chopped onions with a single whole star anise.  This made the house smell AWESOME.

Then I had to make a curry paste out of all my seasonings.  This was made of garlic and ginger paste, curry and chili powders and enough water to make it come together.  In with the onions it goes... 


Then comes the magic.  Somehow, pureed carrots, pureed onions, yogurt, sour cream, and some chicken broth produced this...


Just add chicken and let cook.  

I tossed in some green peppers, left over frozen baby corns, and cashews after it had cooked for a while and this was the final product. 

Oh, and for all of you who want me to come over and cook in your kitchens... this is what Dan gets to deal with when the meal is over.  Be forewarned. I didn't even bother to photograph the floor because that is just too embarrassing. 


He also gets to eat this.   Served with Trader Joe's garlic Naan and some rice. 


Tuesday, August 03, 2010

Tuesday: Battle Tomato

Me -VS- My complete and total inability to spell tomato with out a spell check. 

I had planned to take today off from the iron chef dinner because Dan is working super late, however Allison wanted to hang out and was happy to supply me with an ingredient!

Since I was at Valli Produce yesterday and bought a bajillion tomatoes from their clearance section (yes! Clearance fruits and veggies people! its amazing@! )  I was thrilled that Tomato was Allison's chosen ingredient.

Tonights dinner was a stuffed tomato, with a soufflé like filling.  The filling had bacon and onions and peppers that I sautéd and then mixed in with goat cheese and queso fresco and some egg yolks.   Then I whipped up some egg whites and folded them in, Stuffed the whole thing in the tomatoes and baked for 20 minutes or so.

While the tomatoes were baking I made a tomato cucumber salad with the left over poppy seed dressing from a few days ago, and the best bruschetta ever.  It was so worth it to splurge on those heirloom tomatoes at Dominics this afternoon.


It is actually sad that the basil is on top of this tomato, because this was the prettiest tomato that I have ever sliced.   It was also very very sweet.

Monday, August 02, 2010

Monday: Battle Honey.

Me -vs- the total over stimulation provided by Valli Produce


For this battle, I converted my grill into a smoker.

I put charcoal on the left side with a pan of wood chips on top, a pan of water on the right side.  Then I put the ribs on top of the grill rack and let them cook for 2 hours.  I used a thermometer and added wood chips and charcoal as needed to keep it between 225 and 250 degrees.  After 2 hours, I wrapped the ribs in foil and added some apple juice and let them cook for another hour with out adding wood chips.  Then I finished them off with a home made honey bbq sauce.  I also made some honey cornbread muffins and cinnamon honey butter and corn on the cob.

Then, because I had 3 and half hours during the cook time, I made up a drink I decided to call the Tini Bumblebee.   Strawberry honey lemon aid, mixed with vodka and elderflower liquor.    Yum.

I rounded out the meal with a cheese plate that included almonds, dried cranberries, and some wild flower honey we had brought back from Sonoma.   I think the cheese plate was over kill. 

Cooking Project

It's time to repurpose this blog into something useful.  Instead of writing pages and pages about my new cooking project on Facebook, I will post those updates here and then link to them.  I have much too much to say, and I'm pretty excited about the project.

I decided at the end of the school year that I needed to take cooking classes or something this summer.  Cooking is always exciting and creative for me, so I thought it would be a good thing to pursue.   Upon further reflection I realized that I didn't want any one else to tell me how to cook.  That isnt the fun part.  I just need to cook more!   So I came up with my Iron Chef plan.

Each night, Dan chooses an ingredient, and I make dinner.  I don't adhere strictly to Iron Chef rules, but I try to use the ingredient in as many dishes as possible, and at the end of the week Dan chooses a winner.  I may some day go so far as to invite guests over and allow them to choose my secret ingredient, but the project is young, so we shall see.

Last week was our first week, and this is the summary of the meals.

Monday:  Battle Eggplant
I had this beautiful eggplant that the kid at the farmer's market conned me into buying ( it was the last one, and he gave it to me for 75 cents! ) so I made chicken and eggplant parmesean over rigatoni with a doctored up canned tomato sauce.

Tuesday: Battle Mango
I marinated pork chops in soy sauce, ginger syrup, and olive oil  (with some spices) and cooked them in the grill pan.   Then I made homemade sweet and sour and spicy veggies with mango, pineapple, peppers, onions, and baby corn.   I have always loved mango sticky rice, but Dan finds it too sweet.  I switched up the recipe and made it using coconut milk and salt and pepper and less mango, which was much more to his taste.

Wednesday: Battle "Whatever the hell is left over and also Dan wants tacos" 
I raided the fridge and pantry and ended up with frozen chicken that I cooked for a couple hours in some left over coconut milk and taco seasonings and onions.  Came out WAY taster than I expected.  I broke down and bought a tomato and jalapeño and made some home made salsa.  I also mixed up some guacamole with an old avacodo that had been living in the back of the fridge.  A dash of coconut milk made it just a bit sweet.  I rounded the meal out with a pre packaged mix of black beans and rice.


Thursday: Battle Green Pepper
Ironically, every meal I had prepared prior to this had peppers as an ingredient.  I also was very anti stuffed peppers for this battle... sooo...  I made grilled steak and pepper sandwiches with this AWESOME salad.  The salad was comparable to a coleslaw, but it was peppers, carrots, red onions and green onions all cut up into matchstick sized bites in a homemade poppy seed dressing. 

Dan declared the winner of week one to be Battle Mango.    Stay tuned for more! 

Thursday, April 30, 2009

its been a while...

So, since the last time ive posted, The dishes set has been completed. The couch has been finished, and replaced, and Ive been married for 9 months.


hm.

Im debating if blogs are passe.

Tuesday, August 14, 2007

The summer is almost over

I keep going through all the things i did/was supposed to do. I had a running list on my desk top of dates and events. I keep deleting things and then adding 4 more. In some ways i think i am less busy during the school year, but its just that there is so much more routine things going on.

I know its been like a year. I'd make lame promises of updates like we always do, but Im just going to be realistic.

So here is another photo essay. These are the pink sunflowers in my yard. They were pink on the package of seeds, but these are more of a variegated yellow and maroon. either way, they are pretty.


and these are the burgundy ones


This is the pitiful hydrangea bloom from the plant that I managed to NOT kill. I regard this as a miracle of sorts. Frank (the ficus from the last entry) has long since passed on. Perhaps I should post a photo of his skeleton. I would, but i dont think i have one.


This is what that same hydrangea used to look like.


This was the henna tatoo i got on my foot at ren faire.


This is me in the bridesmaid dress for my sisters wedding. she looked at the digital camera after she took this and said, "you look terrible"


This is a picture of me and dan when we first started dating.


This is us a few years ago.


This is us a few months ago.


And this is me and Dan now.